Using Seeed Studio NFC shield with official Arduino Wi-fi shield

This doesn’t work without some alteration.  The NFC shield will report “chip not found” with any of the examples.

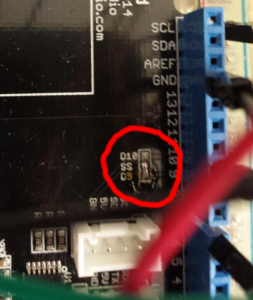
The first problem is that both shields use pin 10 for the SPI chip select.  To fix this, cut the PCB track between the D10 and SS pads on the NFC shield and bridge the pads to link D9 to SS, as shown in the picture below.

link

Following this you will need to use code like

PN532_SPI pn532spi(SPI, 9);

to tell the NFC library to use the correct chip select pin.

The second problem appears to be that the output buffer that connects the Wifi shield to the SPI MISO line does not have a tri-state output.  Hence it does not share the MISO line correctly with the NFC shield.  I fixed this by adding a tri-state buffer to the Ethernet shield’s MISO output.

wifi_fix-svg

I did this by taking the Wifi shield off the board and connecting the required pins with wire (SPI bus, 5V, IOREF, 4, 7, 10, GND).  Be sure to power the 74HC125 with +5V, not +3.3V.

Finally, as discussed by Oleg Mazurov here the NFC shield library sets the SPI bus bit order to LSB first, which is the opposite of what everybody else uses.  Fixing this for the version of the library on my machine requires this patch:


diff --git a/PN532_SPI/PN532_SPI.cpp b/PN532_SPI/PN532_SPI.cpp
index 99ece85..250cb97 100644
--- a/PN532_SPI/PN532_SPI.cpp
+++ b/PN532_SPI/PN532_SPI.cpp
@@ -7,6 +7,11 @@
 #define DATA_WRITE      1
 #define DATA_READ       3

+uint8_t PN532_SPI::reverseLookup[] = {
+       0x0, 0x8, 0x4, 0xc, 0x2, 0xa, 0x6, 0xe,
+       0x1, 0x9, 0x5, 0xd, 0x3, 0xb, 0x7, 0xf,
+    };
+
 PN532_SPI::PN532_SPI(SPIClass* spi, uint8_t ss)
 {
     command = 0;
@@ -20,7 +25,6 @@ void PN532_SPI::begin()

     _spi->begin();
     _spi->setDataMode(SPI_MODE0);  // PN532 only supports mode0
-    _spi->setBitOrder(LSBFIRST);
 #if defined __SAM3X8E__
     /** DUE spi library does not support SPI_CLOCK_DIV8 macro */
     _spi->setClockDivider(42);             // set clock 2MHz(max: 5MHz)
diff --git a/PN532_SPI/PN532_SPI.h b/PN532_SPI/PN532_SPI.h
index 53ff697..f601c28 100644
--- a/PN532_SPI/PN532_SPI.h
+++ b/PN532_SPI/PN532_SPI.h
@@ -24,12 +24,18 @@ private:
     void writeFrame(const uint8_t *header, uint8_t hlen, const uint8_t *body = 0, uint8_t blen = 0);
     int8_t readAckFrame();

+    static uint8_t reverseLookup[16];
+
+    inline uint8_t reverse(uint8_t v) {
+        return (reverseLookup[v & 0xf] | reverseLookup[v >> 4]);
+    }
+
     inline void write(uint8_t data) {
-        _spi->transfer(data);
+        _spi->transfer(reverse(data));
     };

     inline uint8_t read() {
-        return _spi->transfer(0);
+        return reverse(_spi->transfer(0));
     };
 };

ZigBee with Samsung Smartthings

Me and a student have been trying to work out how to talk to a Samsung SmartThings hub using ZigBee.  The purpose of this is to make a device based on an Arduino which can offer up a sensor reading to the hub.  We are using this Zigbee module connected to an Arduino via this shield.

There are many things that took a while to work out, and I’ve collected a few of them here, in no particular order.  They may not be accurate; do let me know if you find mistakes.

Basics

There are two series (versions) of the XBee modules, series 1 and 2, and they are completely incompatible.  The Smartthings hub requires series 2.

The XBee module (XBee being Digi’s tradename for its ZigBee products) communicates with its host via serial.  The shield allows the module’s serial UART to be connected either to the Arduino or directly to the computer plugged into the Arduino’s USB port (via the switch on the shield).  The latter arrangement (with the switch to the USB setting) is very useful for development and debugging.  With a Linux host you can talk to the XBee module via /dev/ttyACM0 or similar.

The XBee module has two modes: transparent and API.  With transparent mode a pair of XBee modules operate as a replacement for a serial link.  I haven’t tried this out.  In API mode your module is prepared to be a part of a ZigBee network, which is the way we are using it.

A ZigBee network is pretty fully functional affair, with a protocol stack, TCP/IP-like addressing and so on.  The Wikipedia entry is worth reading if you are not familiar with it.

Getting onto the network

We followed this excellent guide to get our XBee to talk to the Smartthings hub.  You can do the negotiation in Python using the serial module without too much pain.

Frames

With a ZigBee network we communicate in frames.  These are made up of:

  • 0x7e
  • frame length MSB
  • frame length LSB
  • frame
  • checksum

To calculate the checksum, add every frame byte together, take the LSB and then subtract that from 0xff.

The first byte of the frame is the command ID.  The most interesting from our point of view is 0x91 (ZigBee explicit RX indicator); when the modem receives a ZigBee RF packet it is sent out to the UART using this message type.

More as we find it…


New BBC radio streams with mpd

It seems that the BBC’s radio streams have changed a bit during 2015.  I was interested in getting them to work with mpd.

Note that with mpd streams are maintained by the client, not the server: the client must do something like:

mpc add "http://some.server/some.stream:1234"

As is stands it would appear that mpd cannot handle the streams that are now used by the BBC.  They are:

You can add all these URLs as streams.  They don’t work, however, unless you add a patch to mpd to let FFmpeg handle http:// URIs:

diff --git a/src/input/plugins/FfmpegInputPlugin.cxx b/src/input/plugins/FfmpegInputPlugin.cxx
index 669f8d4..c839ffe 100644
--- a/src/input/plugins/FfmpegInputPlugin.cxx
+++ b/src/input/plugins/FfmpegInputPlugin.cxx
@@ -96,7 +96,8 @@ input_ffmpeg_open(const char *uri,
            !StringStartsWith(uri, "rtsp://") &&
            !StringStartsWith(uri, "rtmp://") &&
            !StringStartsWith(uri, "rtmpt://") &&
-           !StringStartsWith(uri, "rtmps://"))
+           !StringStartsWith(uri, "rtmps://") &&
+           !StringStartsWith(uri, "http://"))
                return nullptr;
 
        AVIOContext *h;
diff --git a/src/ls.cxx b/src/ls.cxx
index 6ab68b6..be94af8 100644
--- a/src/ls.cxx
+++ b/src/ls.cxx
@@ -48,6 +48,7 @@ static const char *remoteUrlPrefixes[] = {
        "rtmp://",
        "rtmpt://",
        "rtmps://",
+       "http://",
 #endif
 #ifdef ENABLE_SMBCLIENT
        "smb://",

How to set up a EGroupware with LDAP on Debian Wheezy

This is an install that took an inordinate amount of time and seemed quite badly documented, so I thought I’d make the documentation slightly more confusing by saying what I did.

Disclaimer: I made these notes during a re-install on a possibly not-quite-clean system, so there might be bits missing.  Futhermore, I am not an expert on LDAP.

The basic thing I wanted to achieve was to sync my (Android) phone’s contacts and calendar to a computer and then have the contacts available from LDAP for use with Alpine.  If there’s an easier way to do it, I’m all ears.

Hold tight.

slapd

slapd is the LDAP server.  We’ll use it as egroupware’s backend for storing users and contacts.  Then our contact data is available over LDAP, which is handy.

apt-get install slapd

apt will ask you for a password (twice).  Now do

dpkg-reconfigure slapd

Now apt will ask you some more questions: most of them don’t matter too much but do enter your DNS domain name and organization name (I used carlh.net for both).  Enter the same password again and say no to LDAP2 (for some reason I am not sure of).

egroupware

egroupware is a large online “collaboration tool” with shared calendars, contacts, time tracking etc. etc.  It’s very much overkill for our purposes but it does have effective SyncML support, which is hard to find.

It is not in the main debian repos, so add this line to /etc/apt/sources.list:

deb http://download.opensuse.org/repositories/server:/eGroupWare/Debian_6.0/ ./

then fetch the key for the repo:

wget -O - http://download.opensuse.org/repositories/server:/eGroupWare/Debian_6.0/Release.key | apt-key add -

then

apt-get update
apt-get install egroupware-addressbook egroupware-calendar

During this install you will be asked for a root password for the mysql server, if you don’t already have one installed.

You also need

apt-get install php5-ldap

or egroupware will give confusing errors about LDAP not working.

Now to set up egroupware, which is a little trying, to say the least.  First edit /etc/php5/apache2/php.ini and uncomment the line:

; date.timezone = '';

changing it to something like

date.timezone = 'Europe/London';

Now

chmod o-r /var/lib/egroupware/header.inc.php
cd /etc/apache2/conf.d/
ln -s ../../egroupware/apache.conf egroupware.conf
/etc/init.d/apache2 restart

Open http://localhost/egroupware/setup in a browser, then:

  1. click “run installation tests” (you might get a few warnings but there should be no errors)
  2. click “continue to the header admin”
  3. fill in a header admin password
  4. fill in an egroupware database password
  5. use the header admin password again for the “configuration password”
  6. click “download” to download header.inc.php
  7. copy header.inc.php to /var/lib/egroupware/header.inc.php

Then

chgrp www-data /var/lib/egroupware/header.inc.php

Now:

  1. click “continue”
  2. Log in to the top prompt with the user “admin” and the header admin password from above.
  3. On the next page, enter your MySQL root password and click “create database”.
  4. Click “re-check my installation”
  5. Click “install all applications”
  6. Click “re-check my installation”
  7. Click “edit current configuration”

At this point you will need to

mkdir -p /var/lib/egroupware/default/files
chgrp www-data /var/lib/egroupware/default/files
chmod g+w /var/lib/egroupware/default/files
mkdir -p /var/lib/egroupware/default/backup
chgrp www-data /var/lib/egroupware/default/backup
chmod g+w /var/lib/egroupware/default/backup

Choose LDAP for the “type of authentication” and “store/retrieve user accounts” settings. You will also need to set up the mail server details; I’m not sure why.

Now the LDAP configuration; bear in mind that I set my domain name as “carlh.net” (when configuring slapd). In LDAP-speak, this is dc=carlh,dc=net (the domain name is split up into “domain components” (DCs). Wherever I say dc=carlh,dc=net below you need to substitute it for your domain name.

The LDAP options are:

  1. LDAP host: localhost
  2. Accounts context: ou=accounts,dc=carlh,dc=net
  3. Groups context: ou=groups,dc=carlh,dc=net
  4. Root DN: cn=admin,dc=carlh,dc=net
  5. LDAP root password: whatever you entered when configuring slapd
  6. Allow usernames identical to system users: yes

Now for some bizarre reason we have to create the accounts and groups “directories” in LDAP.  First:

apt-get install ldap-utils

Now, run the following two commands, entering your LDAP admin password for each one:

ldapadd -D 'cn=admin,dc=carlh,dc=net' -W << EOF
dn: ou=groups, dc=carlh, dc=net
objectClass: top
objectClass: organizationalUnit
ou: admin
EOF
ldapadd -D 'cn=admin,dc=carlh,dc=net' -W << EOF
dn: ou=accounts, dc=carlh, dc=net
objectClass: top
objectClass: organizationalUnit
ou: admin
EOF

Back in the browser, click save, then on the next page click “create admin account”. Create an account for your administrator, then go to http://localhost/egroupware and log on with that account.

LDAP permissions hack

slapd will only allow egroupware to add contacts to the LDAP database if you give slapd the appropriate ACL (access control list). The correct ACL is shipped with egroupware, but unfortunately slapd has recently changed its configuration format which means that you can’t use the egroupware-supplied one.

What really should happen is a conversion of this ACL to the new format required by slapd. I half-heartedly tried and failed to get this right. As a complete and very insecure hack I have currently just set an ACL to allow everyone to write to the database. If you do this, make sure the LDAP server is only accessible to those you trust.

The hack is run the following command:

ldapmodify -Y EXTERNAL -H ldapi:/// <<EOF
dn: olcDatabase={1}hdb,cn=config
changetype: modify
add: olcAccess
olcAccess: {0}to * by * write
EOF

Finally, we can set our address book up to use LDAP.  Logged in with your normal user account, click “Admin” at the top left of the egroupware page and then choose “site configuration” under “address book”.  Select “LDAP” under where you want to store/retrive contacts.  LDAP host for contacts should be localhost, and the context dc=carlh,dc=net.  Click Save.

Alpine setup

Now you can get alpine to read the LDAP contacts list by doing Setup/Directory/Add and then specifying:

  1. ldap-server: localhost
  2. search-base: dc=carlh,dc=net
  3. bind-dn: cn=admin,dc=carlh,dc=net

And tick “use implicitly from composer”.
Web page to upload to Amazon AWS

Here’s how to make a simple web page to allow people to upload files to an Amazon AWS bucket from your site.  Some of the details are a bit murky, but it does seem to work. You will need a bucket with upload permissions enabled (and probably public downloads disabled).

First, you need a policy, saved as a text file.  Here’s mine:

{ "expiration": "2090-12-01T12:00:00.000Z",
  "conditions": [
    {"bucket": "MY-BUCKET"},
    ["starts-with", "$key", "upload"],
    {"acl": "public-read"},
    {"success_action_redirect": "http://example.com/successful_redirect.html"},
    {"x-amz-meta-uuid": "14365123651274"},
  ]
}

Replace MY-BUCKET with the name of your AWS bucket, and the successful_redirect URL with where the user should be taken when an upload succeeds.  I’ve no idea what the x-amz-meta-uuid does, to be honest; that’s the one of Amazon’s example.

Now, you need to encode this policy and sign it with your AWS secret key.  Save the policy as upload_policy and use this python script:

import base64
import hmac
import hashlib

aws_secret_key = 'MY-SECRET-KEY'

with open('upload_policy', 'r') as f:
    policy_document = f.read()

policy = base64.b64encode(policy_document)
signature = base64.b64encode(hmac.new(aws_secret_key, policy, hashlib.sha1).digest())

print 'Policy:'
print policy
print 'Signature:'
print signature

Replace MY-SECRET-KEY with your Amazon AWS secret key.  The script will print out policy and signature values, which you should paste into this HTML:

<table>
<form action="http://MY-BUCKET-NAME.s3.amazonaws.com/" method="post" enctype="multipart/form-data">
  <input type="hidden" name="key" value="upload-${filename}"/><br/>
  <input type="hidden" name="acl" value="public-read"/>
  <input type="hidden" name="success_action_redirect" value="http://example.com/successful_upload.html"/>
  <input type="hidden" name="x-amz-meta-uuid" value="14365123651274"/>
  <input type="hidden" name="AWSAccessKeyId" value="MY-ACCESS-KEY"/>
  <input type="hidden" name="Policy" value="MY-POLICY"/>
  <input type="hidden" name="Signature" value="MY-POLICY-SIGNATURE"/>
  <tr><td>File</td><td><input type="file" name="file"/></td></tr>
  <!-- The elements after this will be ignored -->
  <tr><td></td><td><input type="submit" name="submit" value="Upload"/></td></tr>
</form>
</table>

Once again, replace MY-BUCKET-NAME with your bucket, and the successful_upload URL with one appropriate for your site. MY-ACCESS-KEY needs replacing with your AWS access key.

Files that are uploaded should then appear in your AWS bucket.

Making H264 videos that will play on Quicktime 7 and X

It took me a while to work out how to encode H264/AAC files that will play in Quicktime 7 and X from a set of still images (and WAV files).

I’ve no idea whether this is the best approach, but it seems to work, after a fashion:

x264 --pass 1 --fps 24 --bitrate 1000 --level 4.1 --profile main -o picture.264 tiffs/%08d.tiff
faac -q 100 -c 48000 -b 192 sound.wav
MP4Box -mpeg4 -fps 24 -add picture.264 -add sound.aac output.mp4

The -mpeg4 option seems to be crucial for Quicktime 7 and X to set up the type field for the sound correctly.